0. Introduction
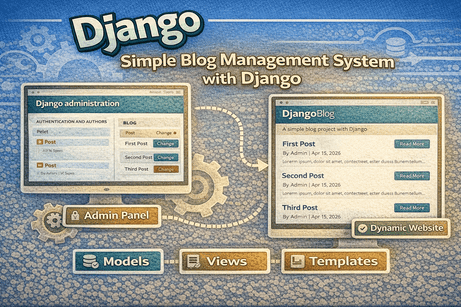
This project is perfect because it uses almost all the concepts you learned from Tutorial 1 to Tutorial 12:
- project and app structure
- URLs and routing
- views
- templates
- passing data from views to templates
- static files
- models
- migrations
- Django admin
It is simple enough for beginners, but complete enough to feel like a real web application.
1. Project Idea
You will build a simple blog website where:
- the homepage displays all blog posts
- each post has a title, content, author, and publication date
- users can open a detail page for each post
- the site has CSS styling
- blog posts are stored in the database
- posts are managed from the Django admin panel
2. Concepts Covered from Tutorials 1 to 12
Tutorial 1 — Introduction to Django
You understand what Django is and why this project fits a data-driven website.
Tutorial 2 — Setting Up the Django Development Environment
You create the environment and install Django.
Tutorial 3 — Understanding Django Project Structure
You work with manage.py, settings.py, urls.py, app folders, and templates.
Tutorial 4 — Creating Your First Django App
You create the blog app.
Tutorial 5 — Django URLs and Routing
You create homepage and detail routes.
Tutorial 6 — Django Views Basics
You build views for listing posts and showing a single post.
Tutorial 7 — Django Templates Basics
You create reusable HTML templates.
Tutorial 8 — Passing Data from Views to Templates
You send posts from views to templates.
Tutorial 9 — Static Files in Django
You add CSS and images.
Tutorial 10 — Django Models Introduction
You define the Post model.
Tutorial 11 — Database Migrations in Django
You create and apply migrations.
Tutorial 12 — Django Admin Interface
You register the model and manage posts in admin.
3. Final Features of the Project
The project will include:
- homepage with all blog posts
- post detail page
- styled layout with CSS
- dynamic data from the database
- admin interface to add/edit/delete posts
4. Project Name
You can call it:
MyBlog
or
DjangoBlog
I will use:
DjangoBlog
5. Step-by-Step Solution
Step 1: Create the project
django-admin startproject config .Step 2: Create the app
python manage.py startapp blog6. Register the App
Open config/settings.py and add:
INSTALLED_APPS = [
    'django.contrib.admin',
    'django.contrib.auth',
    'django.contrib.contenttypes',
    'django.contrib.sessions',
    'django.contrib.messages',
    'django.contrib.staticfiles',
    'blog',
]
7. Create the Model
Open blog/models.py:
from django.db import models

class Post(models.Model):
    title = models.CharField(max_length=200)
    content = models.TextField()
    author = models.CharField(max_length=100)
    created_at = models.DateTimeField(auto_now_add=True)
    is_published = models.BooleanField(default=True)

    def __str__(self):
        return self.title
8. Run Migrations
python manage.py makemigrations
python manage.py migrate
9. Register the Model in Admin
Open blog/admin.py:
from django.contrib import admin
from .models import Post

class PostAdmin(admin.ModelAdmin):
    list_display = ('id', 'title', 'author', 'is_published', 'created_at')
    search_fields = ('title', 'author')
    list_filter = ('is_published', 'created_at')
    ordering = ('-created_at',)

admin.site.register(Post, PostAdmin)
10. Create a Superuser
python manage.py createsuperuser11. Create the Views
Open blog/views.py:
from django.shortcuts import render, get_object_or_404
from .models import Post

def home(request):
    posts = Post.objects.filter(is_published=True).order_by('-created_at')
    context = {
        'posts': posts,
        'page_title': 'Home'
    }
    return render(request, 'blog/home.html', context)

def post_detail(request, post_id):
    post = get_object_or_404(Post, id=post_id, is_published=True)
    context = {
        'post': post,
        'page_title': post.title
    }
    return render(request, 'blog/post_detail.html', context)
12. Create App URLs
Create blog/urls.py:
from django.urls import path
from . import views

app_name = 'blog'

urlpatterns = [
    path('', views.home, name='home'),
    path('post/<int:post_id>/', views.post_detail, name='post_detail'),
]
13. Connect App URLs to Project URLs
Open config/urls.py:
from django.contrib import admin
from django.urls import path, include

urlpatterns = [
    path('admin/', admin.site.urls),
    path('', include('blog.urls')),
]
Now:
/→ homepage/post/1/→ post detail page
14. Create Templates
Create this structure:
blog/
└── templates/
    └── blog/
        ├── base.html
        ├── home.html
        └── post_detail.html
blog/templates/blog/base.html
{% load static %}
<!DOCTYPE html>
<html lang="en">
<head>
<meta charset="UTF-8">
<meta name="viewport" content="width=device-width, initial-scale=1.0">
<title>{{ page_title }} | DjangoBlog</title>
<link rel="stylesheet" href="{% static 'blog/css/style.css' %}">
</head>
<body>
<header>
<div class="container">
<h1><a href="{% url 'blog:home' %}">DjangoBlog</a></h1>
<p class="subtitle">A simple blog project with Django</p>
</div>
</header>
<main class="container">
{% block content %}{% endblock %}
</main>
<footer>
<div class="container">
<p>© 2026 DjangoBlog. All rights reserved.</p>
</div>
</footer>
</body>
</html>blog/templates/blog/home.html
{% extends 'blog/base.html' %}

{% block content %}
<h2>Latest Posts</h2>

{% if posts %}
    <div class="post-list">
        {% for post in posts %}
            <div class="post-card">
                <h3>
                    <a href="{% url 'blog:post_detail' post.id %}">
                        {{ post.title }}
                    </a>
                </h3>
                <p class="meta">
                    By {{ post.author }} | {{ post.created_at|date:"M d, Y" }}
                </p>
                <p>
                    {{ post.content|truncatewords:25 }}
                </p>
                <a class="read-more" href="{% url 'blog:post_detail' post.id %}">
                    Read More
                </a>
            </div>
        {% endfor %}
    </div>
{% else %}
    <p>No posts available yet.</p>
{% endif %}
{% endblock %}
blog/templates/blog/post_detail.html
{% extends 'blog/base.html' %}

{% block content %}
<article class="post-detail">
    <h2>{{ post.title }}</h2>
    <p class="meta">
        By {{ post.author }} | {{ post.created_at|date:"M d, Y - H:i" }}
    </p>
    <div class="post-content">
        <p>{{ post.content }}</p>
    </div>
    <a class="back-link" href="{% url 'blog:home' %}">← Back to Home</a>
</article>
{% endblock %}
15. Add Static Files
Create this structure:
blog/
└── static/
    └── blog/
        └── css/
            └── style.css
blog/static/blog/css/style.css
body {
    margin: 0;
    font-family: Arial, sans-serif;
    background-color: #f4f7fb;
    color: #222;
}

.container {
    width: 85%;
    max-width: 1000px;
    margin: 0 auto;
}

header {
    background-color: #0d6efd;
    color: white;
    padding: 25px 0;
    text-align: center;
}

header h1 {
    margin: 0;
}

header h1 a {
    color: white;
    text-decoration: none;
}

.subtitle {
    margin-top: 8px;
    font-size: 14px;
}

main {
    padding: 30px 0;
}

.post-list {
    display: grid;
    gap: 20px;
}

.post-card {
    background: white;
    padding: 20px;
    border-radius: 10px;
    box-shadow: 0 2px 8px rgba(0, 0, 0, 0.08);
}

.post-card h3 {
    margin-top: 0;
}

.post-card h3 a {
    text-decoration: none;
    color: #0d6efd;
}

.meta {
    color: #666;
    font-size: 14px;
    margin-bottom: 15px;
}

.read-more,
.back-link {
    display: inline-block;
    margin-top: 10px;
    color: white;
    background-color: #0d6efd;
    padding: 8px 14px;
    border-radius: 6px;
    text-decoration: none;
}

.read-more:hover,
.back-link:hover {
    background-color: #0b5ed7;
}

.post-detail {
    background: white;
    padding: 25px;
    border-radius: 10px;
    box-shadow: 0 2px 8px rgba(0, 0, 0, 0.08);
}

footer {
    background: #222;
    color: white;
    text-align: center;
    padding: 15px 0;
    margin-top: 40px;
}
16. Run the Project
python manage.py runserverNow open:
And for admin:
17. Add Blog Posts from Admin
After logging into /admin/:
- click Posts
- click Add Post
- fill in:
- title
- content
- author
- is_published
- save
Then go back to the homepage and you will see the posts displayed dynamically.
18. Final Project Structure
DjangoBlog/
├── manage.py
├── db.sqlite3
├── config/
│   ├── __init__.py
│   ├── settings.py
│   ├── urls.py
│   ├── asgi.py
│   └── wsgi.py
└── blog/
    ├── admin.py
    ├── apps.py
    ├── migrations/
    ├── models.py
    ├── tests.py
    ├── views.py
    ├── urls.py
    ├── templates/
    │   └── blog/
    │       ├── base.html
    │       ├── home.html
    │       └── post_detail.html
    └── static/
        └── blog/
            └── css/
                └── style.css
19. What the Student Learns from This Project
By completing this project, the student learns how to:
- create a Django project and app
- configure URLs
- write views
- create templates
- pass data to templates
- style pages with static files
- create models
- run migrations
- manage data with Django admin
So this project is an excellent practical summary of Tutorials 1 to 12.
20. Possible Improvements
After finishing this beginner version, you can improve the project with:
- categories for posts
- image uploads
- comments system
- search bar
- pagination
- user authentication
- create/update/delete views from the frontend
These improvements would fit perfectly in your next tutorials.
21. Short Project Description
This project is a simple blog management system built with Django. It allows administrators to create and manage blog posts through the Django admin interface, while visitors can browse posts on the homepage and open individual post detail pages. The project uses Django models, views, templates, URL routing, static files, migrations, and the admin dashboard, making it an ideal beginner project covering the core concepts of Django.
22. Conclusion
This Simple Blog Management System is the best beginner project to apply Tutorials 1 to 12 in one complete application. It is realistic, easy to understand, and gives a strong foundation before moving to forms, CRUD, authentication, and larger projects.










💬 Comments
No comments yet. Be the first to comment!
Login to comment.