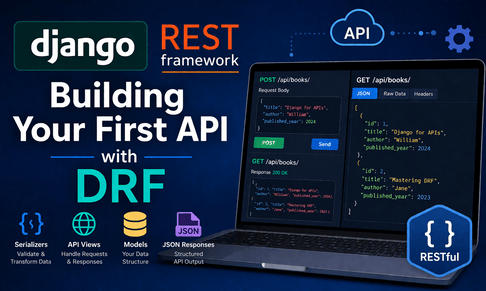
In the previous tutorial, we introduced Django REST Framework and its role in API development. Now it is time to build a real API step by step. The official DRF tutorial and quickstart both present this workflow clearly: create or reuse a Django project, add rest_framework to INSTALLED_APPS, define a serializer, write API views, connect URLs, and test the result through the browsable API or JSON output.
This tutorial will show you how to build your first working API using DRF in a clean beginner-friendly way. We will create a simple Book API, expose it through JSON, accept submitted data, validate that data with a serializer, and return proper HTTP responses. Along the way, you will understand why request.data, Response, APIView, and ModelSerializer are so important in DRF. The official documentation explains that serializers convert model instances and querysets into native Python data types suitable for rendering, while APIView and Response provide API-aware request handling and content negotiation.
1. What we are going to build
We are going to build a very small API for books. It will support these actions:
- list all books
- create a new book
- retrieve one book
- update a book
- delete a book
This follows the standard resource-oriented style commonly used in REST APIs, where endpoints are organized around resources and HTTP methods such as GET, POST, PUT, PATCH, and DELETE. DRF’s generic views and tutorial examples are structured around these common API actions.
A possible final result will look like this:
GET /api/books/→ list booksPOST /api/books/→ create a bookGET /api/books/1/→ retrieve one bookPUT /api/books/1/→ update one bookDELETE /api/books/1/→ delete one book
Even though this is a simple project, it teaches the exact architecture you will reuse in larger APIs.
2. Installing DRF and preparing the project
The DRF quickstart shows the standard installation command:
pip install djangorestframeworkAfter installation, add rest_framework to INSTALLED_APPS in settings.py:
INSTALLED_APPS = [
    ...
    'rest_framework',
    'books',
]
This is the same setup pattern shown in the official DRF quickstart and tutorial materials.
If you do not yet have a project and app, you can create them like this:
django-admin startproject myproject
cd myproject
python manage.py startapp books
Then run migrations:
python manage.py migrateAt this stage, your Django project is ready to host API endpoints.
3. Creating the model
Let us begin with a normal Django model. This part is pure Django, not DRF yet. Create the following in books/models.py:
from django.db import models

class Book(models.Model):
    title = models.CharField(max_length=200)
    author = models.CharField(max_length=120)
    published_year = models.IntegerField()
    created_at = models.DateTimeField(auto_now_add=True)

    def __str__(self):
        return self.title
This model is simple, but it is enough for learning. We have a title, author, and publication year. After that, run:
python manage.py makemigrations
python manage.py migrate
You can also register the model in the admin if you want to add data manually:
from django.contrib import admin
from .models import Book

admin.site.register(Book)
At this point, the database part exists, but no API exists yet. That is where DRF comes in.
4. Creating your first serializer
The serializer is one of the most important parts of DRF. The official serializer documentation explains that serializers convert model instances and querysets into native Python types that can be rendered into JSON or other content types, and they also handle deserialization and validation of incoming data. It also notes that ModelSerializer is a shortcut for serializers that work with model instances and querysets.
Create a new file: books/serializers.py
from rest_framework import serializers
from .models import Book

class BookSerializer(serializers.ModelSerializer):
    class Meta:
        model = Book
        fields = ['id', 'title', 'author', 'published_year', 'created_at']
This short class does a lot of work for us. It tells DRF:
- which model to use
- which fields to expose in the API
- how to validate incoming data for those fields
So if a client sends book data to the API, the serializer will check whether the fields are valid before saving them.
Why serializers matter so much
A beginner often thinks, “Why not just return model data directly?” The answer is that raw model instances are not automatically safe or suitable for API output. Serializers define the public shape of the data. They also prevent invalid data from being saved without checks. This is why serializers are central in DRF. The docs explicitly compare them to Django’s Form and ModelForm classes in how they control output and validate input.
5. Building the first API view with APIView
Now we create our first actual API endpoint. DRF provides APIView, which the official docs describe as a class that subclasses Django’s View while changing the request object to DRF’s Request, allowing Response returns, handling content negotiation, and running authentication and permission checks before dispatch.
Create this in books/views.py:
from rest_framework.views import APIView
from rest_framework.response import Response
from rest_framework import status
from .models import Book
from .serializers import BookSerializer

class BookListCreateAPIView(APIView):
    def get(self, request):
        books = Book.objects.all().order_by('-created_at')
        serializer = BookSerializer(books, many=True)
        return Response(serializer.data)

    def post(self, request):
        serializer = BookSerializer(data=request.data)
        if serializer.is_valid():
            serializer.save()
            return Response(serializer.data, status=status.HTTP_201_CREATED)
        return Response(serializer.errors, status=status.HTTP_400_BAD_REQUEST)
This single class already gives us two operations:
GETto list all booksPOSTto create a new book
Deep explanation of what happens here
When a GET request reaches this view, we query all books from the database. Then we pass that queryset into BookSerializer(books, many=True). The many=True part is very important because we are serializing a collection of objects, not a single one. The serializer converts those model instances into Python primitives, and Response(serializer.data) lets DRF render that into the appropriate response format, usually JSON. The Response documentation explains that DRF performs content negotiation to determine how the final output should be rendered.
When a POST request reaches the same view, we do something different. This time we pass request.data into the serializer. DRF’s tutorial explains that request.data is preferred for APIs because, unlike request.POST, it handles arbitrary parsed data and works for methods such as POST, PUT, and PATCH.
Then we call serializer.is_valid(). If the submitted data is correct, serializer.save() creates the object in the database. If something is wrong, we return the serializer’s validation errors with a 400 Bad Request status code.
This pattern is foundational in DRF:
- incoming data goes into the serializer
- serializer validates it
- valid data is saved
- invalid data returns structured errors
6. Adding the detail view
Now let us create endpoints for a single book:
from django.shortcuts import get_object_or_404
from rest_framework.views import APIView
from rest_framework.response import Response
from rest_framework import status
from .models import Book
from .serializers import BookSerializer

class BookDetailAPIView(APIView):
    def get_object(self, pk):
        return get_object_or_404(Book, pk=pk)

    def get(self, request, pk):
        book = self.get_object(pk)
        serializer = BookSerializer(book)
        return Response(serializer.data)

    def put(self, request, pk):
        book = self.get_object(pk)
        serializer = BookSerializer(book, data=request.data)
        if serializer.is_valid():
            serializer.save()
            return Response(serializer.data)
        return Response(serializer.errors, status=status.HTTP_400_BAD_REQUEST)

    def delete(self, request, pk):
        book = self.get_object(pk)
        book.delete()
        return Response(status=status.HTTP_204_NO_CONTENT)
Now we support:
- retrieving one book
- updating one book
- deleting one book
Why this structure is useful
This makes the API much closer to real-world CRUD behavior. A collection endpoint handles many objects, while a detail endpoint handles a single object. DRF’s tutorial examples follow this exact learning pattern: list/create in one view, retrieve/update/delete in another.
Why use get_object_or_404
Using get_object_or_404 makes the code cleaner. If the book does not exist, Django automatically raises a 404 response instead of crashing the application.
7. Connecting the URLs
Now connect the views in books/urls.py:
from django.urls import path
from .views import BookListCreateAPIView, BookDetailAPIView

urlpatterns = [
    path('books/', BookListCreateAPIView.as_view(), name='book-list-create'),
    path('books/<int:pk>/', BookDetailAPIView.as_view(), name='book-detail'),
]
Then include them in your main urls.py:
from django.contrib import admin
from django.urls import path, include

urlpatterns = [
    path('admin/', admin.site.urls),
    path('api/', include('books.urls')),
]
Now your API paths are:
/api/books//api/books/<id>/
This is the first moment where the whole system starts to feel real: models, serializers, views, and URLs are finally connected.
8. Testing your first API
DRF’s browsable API is one of its most helpful features. The official browsable API docs explain that DRF can render human-friendly HTML pages for resources and provide forms for submitting POST, PUT, and DELETE requests directly in the browser.
Start the server:
python manage.py runserverThen open:
http://127.0.0.1:8000/api/books/
If everything is connected correctly, you should see a DRF page in your browser. That page may allow you to:
- view the list of books
- submit a new book through a form
- inspect raw JSON via
?format=json
The browsable API is especially useful for beginners because it gives instant visual feedback without needing frontend code.
9. Example JSON requests and responses
Creating a book with POST
Example request body:
{
  "title": "Mastering Django",
  "author": "John Smith",
  "published_year": 2025
}
If valid, the API may return:
{
  "id": 1,
  "title": "Mastering Django",
  "author": "John Smith",
  "published_year": 2025,
  "created_at": "2026-04-17T10:00:00Z"
}
Listing books with GET
Response example:
[
  {
    "id": 1,
    "title": "Mastering Django",
    "author": "John Smith",
    "published_year": 2025,
    "created_at": "2026-04-17T10:00:00Z"
  }
]
Validation errors
If someone sends invalid data, such as a string instead of an integer for published_year, the serializer may return structured errors. This is one of the biggest advantages of serializers: input validation is automatic and standardized. That behavior is a core part of the serializer system described in the official docs.
10. Why request.data is better than request.POST
This is a very important beginner concept. In normal Django form handling, many people are used to request.POST. But DRF explicitly documents that request.POST only handles form data and only works for POST, while request.data handles arbitrary parsed data and works for POST, PUT, and PATCH.
That means request.data is the correct API-first way to read incoming payloads. If you are building APIs, this should become your habit very early.
11. Why Response is better than JsonResponse here
You could manually return JSON with Django’s JsonResponse, but DRF recommends using Response with API views because it integrates with content negotiation and DRF’s rendering system. The Response docs explain that it takes native Python primitives and DRF selects the appropriate renderer based on the request. It also states that using APIView or @api_view is the expected way when returning Response objects.
That is why the standard DRF pattern is:
return Response(serializer.data)rather than manually constructing JSON output everywhere.
12. Improving the code with generic views
What we built above is excellent for learning because it shows the mechanics clearly. But DRF also provides generic views that reduce repetition. The generic views documentation says these views help you quickly build API views that map closely to your database models.
Here is the same API rewritten more compactly:
from rest_framework import generics
from .models import Book
from .serializers import BookSerializer

class BookListCreateAPIView(generics.ListCreateAPIView):
    queryset = Book.objects.all().order_by('-created_at')
    serializer_class = BookSerializer

class BookDetailAPIView(generics.RetrieveUpdateDestroyAPIView):
    queryset = Book.objects.all()
    serializer_class = BookSerializer
This version is shorter and more elegant. But it is better to learn the APIView version first, because then you understand what these generic classes are abstracting for you.
13. What you learned structurally
By building this first API, you have already learned the core DRF workflow:
Model
Defines the database structure.
Serializer
Converts model data into API output and validates input.
API view
Controls request handling and response generation.
URL
Exposes the endpoint publicly.
Response
Returns structured API output.
request.data
Reads client-submitted API input properly.
These are the building blocks you will keep reusing in almost every DRF project.
14. Common mistakes beginners make when building the first API
One common mistake is forgetting to add rest_framework to INSTALLED_APPS. Without that, important DRF components and the browsable API will not behave as expected.
Another mistake is confusing one object and many objects in serializers. If you serialize a queryset, you must use many=True. If you serialize a single model instance, you do not use it.
Another mistake is forgetting to call is_valid() before save(). The serializer must validate data before saving it.
Another one is using request.POST instead of request.data. DRF’s tutorial is very explicit that request.data is the preferred API-focused attribute.
A final common mistake is jumping too fast into viewsets and routers without understanding serializers, APIView, and the request-response cycle. Learning the foundations first makes the advanced shortcuts far easier later.
15. Full code recap
models.py
from django.db import models

class Book(models.Model):
    title = models.CharField(max_length=200)
    author = models.CharField(max_length=120)
    published_year = models.IntegerField()
    created_at = models.DateTimeField(auto_now_add=True)

    def __str__(self):
        return self.title
serializers.py
from rest_framework import serializers
from .models import Book

class BookSerializer(serializers.ModelSerializer):
    class Meta:
        model = Book
        fields = ['id', 'title', 'author', 'published_year', 'created_at']
views.py
from django.shortcuts import get_object_or_404
from rest_framework.views import APIView
from rest_framework.response import Response
from rest_framework import status
from .models import Book
from .serializers import BookSerializer

class BookListCreateAPIView(APIView):
    def get(self, request):
        books = Book.objects.all().order_by('-created_at')
        serializer = BookSerializer(books, many=True)
        return Response(serializer.data)

    def post(self, request):
        serializer = BookSerializer(data=request.data)
        if serializer.is_valid():
            serializer.save()
            return Response(serializer.data, status=status.HTTP_201_CREATED)
        return Response(serializer.errors, status=status.HTTP_400_BAD_REQUEST)

class BookDetailAPIView(APIView):
    def get_object(self, pk):
        return get_object_or_404(Book, pk=pk)

    def get(self, request, pk):
        book = self.get_object(pk)
        serializer = BookSerializer(book)
        return Response(serializer.data)

    def put(self, request, pk):
        book = self.get_object(pk)
        serializer = BookSerializer(book, data=request.data)
        if serializer.is_valid():
            serializer.save()
            return Response(serializer.data)
        return Response(serializer.errors, status=status.HTTP_400_BAD_REQUEST)

    def delete(self, request, pk):
        book = self.get_object(pk)
        book.delete()
        return Response(status=status.HTTP_204_NO_CONTENT)
books/urls.py
from django.urls import path
from .views import BookListCreateAPIView, BookDetailAPIView

urlpatterns = [
    path('books/', BookListCreateAPIView.as_view(), name='book-list-create'),
    path('books/<int:pk>/', BookDetailAPIView.as_view(), name='book-detail'),
]
Main urls.py
from django.contrib import admin
from django.urls import path, include

urlpatterns = [
    path('admin/', admin.site.urls),
    path('api/', include('books.urls')),
]
16. Final conclusion
Your first API in DRF is not just a small coding exercise. It teaches the architecture of modern backend development. The official DRF docs show that serializers are responsible for transforming and validating data, APIView provides API-aware class-based request handling, request.data is the proper way to read incoming payloads, and Response enables content-negotiated output. The browsable API then makes the result easy to inspect and test directly in the browser.
So the big lesson of this tutorial is simple: a DRF API is built by connecting models, serializers, views, and URLs into a clean pipeline that receives data, validates it, saves it, and returns structured responses. Once you understand that pipeline, you are ready for the next step.
In Tutorial 3, the natural continuation is: CRUD API with Django REST Framework, where we can make the API more complete and more professional using generic views or viewsets.










💬 Comments
No comments yet. Be the first to comment!
Login to comment.